CLM Help
CLM Online Help: Fact/Rules & Fluency Cards |
The Fact/Rule
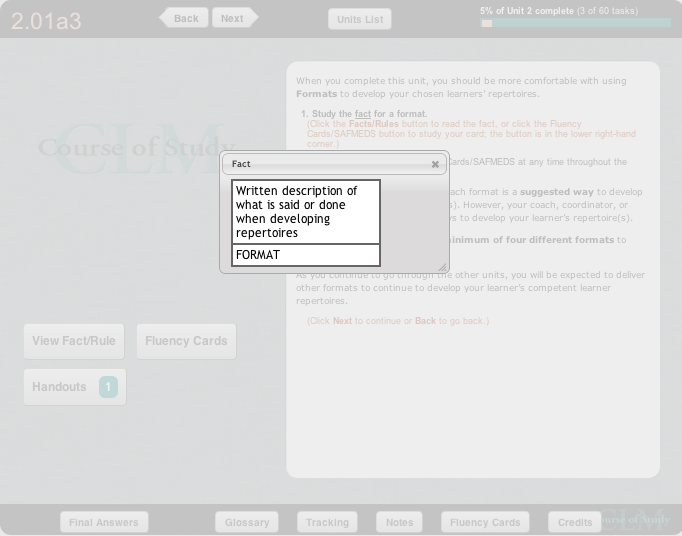
Some tasks have Facts/Rules associated with them, and contain in the text the instruction to click the View Fact/Rule button to see it. The image below shows the screen after the button is clicked and the Fact/Rule is revealed in the lower left corner. The Fact/Rule appears for 5 seconds and then disappears. If you need more time to study it, click the Facts/Rules button again.

If you have trouble learning a fact then break it into sections. For example, learn one part, then the next part, then try to say the sections together.
To learn how the Facts/Rules relate to the learner actions:
a. Take a minute or so to ‘study’ the Fact/Rule for this task. Rehearse it to yourself so that you can say it without having to
read the fact. When you can state the Fact/Rule without hesitation, proceed to study the video clip to assess what’s expected of the learner and the instructor.
b. Run the video clip: Click the ![]() button.
button.
c. Answer the questions for the task: Click the Questions button to see all questions related to this task.
Fluency Cards Screen
Once again, read the CLRA Fact for 0.002 Talker (mand>echoic). You will now begin the process of accumulating Fluency Cards
cards. (Say All Fast a Minute Every Day Shuffled)
1. Click the Facts/Rules button to read the new term (CLRA Fact).
2. In the lower right-hand corner, after you review the fact or rule, click the Fluency Cards button to create your NEW card, which
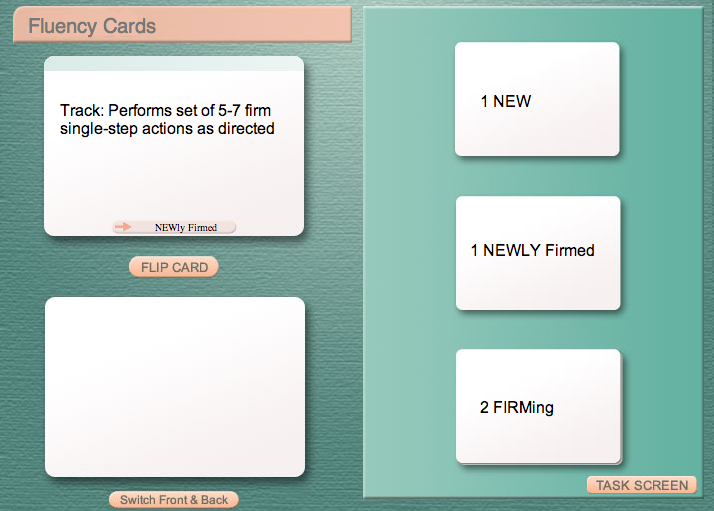
takes you to the Fluency Cards screen (below)

Take a minute to familiarize yourself with the Fluency Cards screen. On the right side are 3 decks of cards, which are very much like flash cards, with a definition on one side and a FACT/Rule on the other. Clicking on any deck picks a card from that deck and reveals it's definition in the upper left blank. Only the top deck on the left side (New) contains any cards yet.
3. In the upper right-hand section, click on the NEW card ('1 NEW' – this indicates there is 1 card in the New deck). Clicking this makes the new card's definition appear in the top left area, as shown above.
4. Study the definition of the term. Immediately, check your recall of the name of the term by clicking the Flip Card button. (The name of the term appears for 5 seconds in the lower left area; you'll need to click Flip Card again to see the name of the term once it disappears)
5. Practice reading the definition and flipping the card to check the name of the term. Once you are confident that you can say the name of the term without hesitation, move the Newly Learned term to the NEWly Firmed deck: on the bottom of the definition card, click the --> NEWly Firmed button to move the card.
If you did NOT move the card to the NEWly Firmed deck, you will not be able to make new cards in the future. Only one NEW card is allowed at any given time.
The NEWly Firmed deck contains up to 6 Newly Learned cards. This short deck provides you the opportunity to practice up to 6 cards at a time. Cards remain in this short deck until you can recite them without hesitation.
6. Once you are confident that you have mastered the NEWly Firmed card, place it in the FIRMing deck: on the bottom of the definition card, click the FIRMing button to move the card.
The FIRMing deck has been designed to facilitate you becoming fluent across all cards. Practice a few minutes each day, stopping only when you can make the correct responses as fast as you can turn the cards.
If you find that the FIRMing deck contains cards that have become less familiar, you can move individual cards back to the NEWly Firmed deck (the short deck) to focus on just a few cards at a time: on the bottom of the definition card, click the --> NEWly Firmed button to move the card.
If you are finished studying your Fluency Cards, click on the Task Screen button to return to the current TASK. You can also go to the Glossary or Notes section from here by clicking on the Glossary button or the Notes button at the bottom.
Note: You can study your Fluency Cards at any time throughout the CLM Course of Study. They will follow you from one unit to the next!
| GLOSSARY>> |